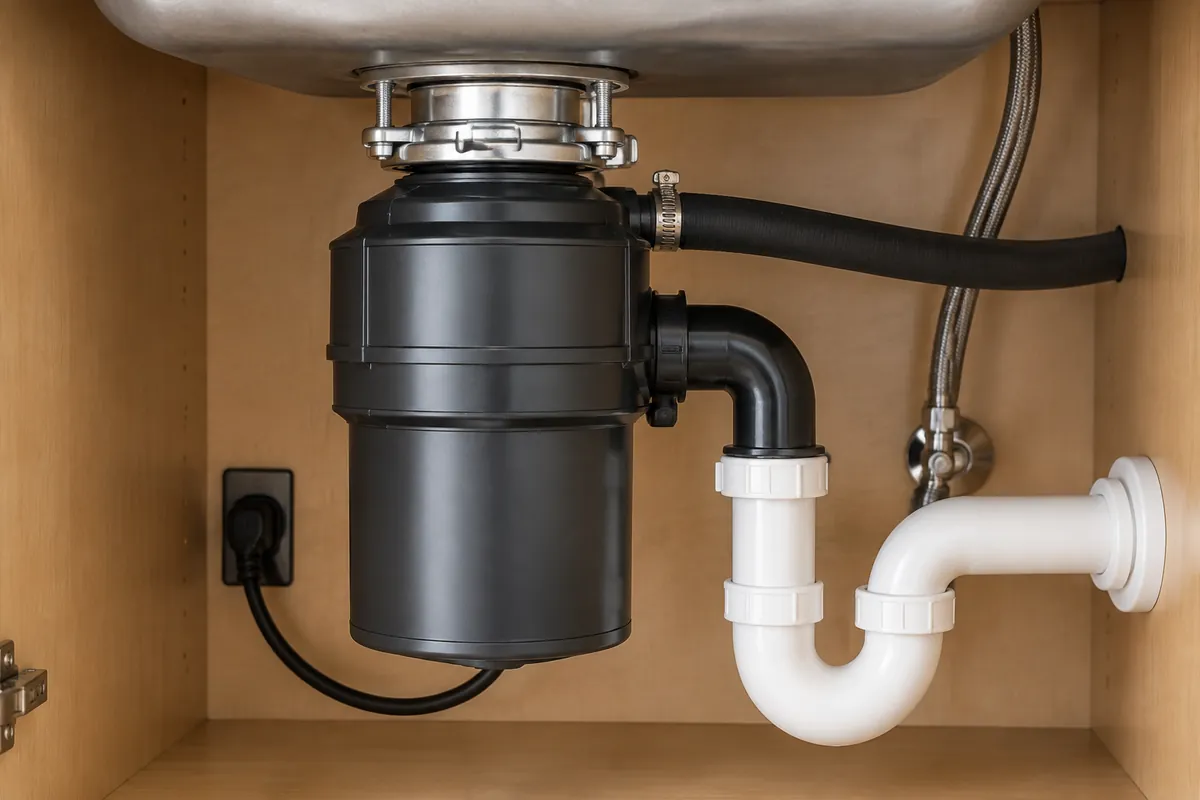
Dry it and watch where the water starts
Disposals leak from several places, and water runs downhill, so the wet spot is not always the source. Wipe the unit and the pipes dry with a paper towel. Put a dry towel or a sheet of newspaper under the sink. Then run water and turn the unit on for a short time.
Watch where the first drop appears. Use a flashlight and look at the top, the sides, the bottom and every hose. That one observation tells you most of what you need to know.
The four leak points
| Where it leaks | What failed | Fixable |
|---|---|---|
| Top, where the sink meets the unit | Mounting gasket or dried putty at the flange | Yes, with a new gasket or reseating the flange |
| Side, from the dishwasher hose | Loose clamp or cracked hose | Yes, tighten or replace |
| Side, at the drain pipe | Loose connection or worn gasket at the outlet | Yes, tighten or replace the gasket |
| Bottom or body | Internal seal failure | No, replace the unit |
A leak from the bottom is the only one that is a clear sign of replacement. The others are typically repairs.
The dishwasher connection
A dishwasher drain hose connects to a small nipple on the side of the disposal. If a plug was never knocked out of that inlet on a new unit, the dishwasher cannot drain and water can back up. A loose hose clamp can also let water seep out.
Check the clamp first. If it is rusted or the hose is cracked, replacement is inexpensive. If the unit is new and the dishwasher does not drain, look for a plug in the inlet.
When a leak is not the disposal at all
Faucet leaks and failing supply lines often drip onto a disposal and run down its body. Water from a drain trap below the unit can look like a leak from the disposal. A quick look at each source with a dry towel separates them.
If the water starts at the faucet base or at a supply valve, see faucet repair. If it starts at the drain pipe below the unit, drain cleaning explains how a plumber checks that line. If the trap is leaking, the repair is at the pipe, not the disposal. A plumber can sort it out quickly.
Replacing a disposal
A replacement unit uses the same mounting arrangement on many sinks. The old unit is detached, the flange is checked, the new unit is mounted, the drain and dishwasher connections are remade and the power is restored. It often takes under two hours.
If the electrical supply is under the sink without a switch, a separate tradesperson may be needed. See garbage disposal repair and installation for the full list of what the job involves.
What a slow leak under the sink does
A disposal leak rarely announces itself. Water collects on the cabinet floor, soaks into the particleboard that many cabinet bases are made from and swells it. The base can stay damp for weeks before anyone sees a stain.
The usual leak points are the sink flange at the top, the clamp where the unit meets the drain, the dishwasher hose connection and the drain line below. Dry everything with a towel, run water and watch with a flashlight to see which joint drips first. Where the water starts decides whether the fix is a tightened clamp, a new seal or a new unit.
How a disposal is built, and why that decides what leaks
A disposal has a mounting assembly at the top, a motor housing in the middle and a grinding chamber with a drain outlet on the side. A rubber gasket seals the top. Another seals the drain elbow. A hose connects the dishwasher. Each of those is a place for a leak.
The housing between those seals is a sealed shell. Water that reaches the motor's lower bearing and seal escapes through the bottom. That is why a leak from the bottom is the one failure that cannot be patched. The unit has to be replaced.
Knowing the parts helps you describe the leak on the phone. Saying that water drips from the side near the dishwasher hose points the plumber to a clamp. Saying it drips from the bottom points to a replacement.
Common mistakes that cause leaks
- Overtightening the mounting ring and cracking the flange.
- Skipping fresh plumber's putty when reinstalling the flange.
- Letting the unit hang unsupported so the weight loosens the connections.
- Running the unit with a hard object stuck, which shakes seals loose.
- Pouring hot grease down the drain, which cools and clogs the line behind the unit.
Most leaks start small. A drip you notice in the first week is cheap to fix. A drip that ruins a cabinet floor over a month is not. Put a small container or a dry cloth under the unit if you are unsure.
Deciding on the spot: a short flow
Is water coming from the bottom or body?
If yes, replace the unit.
Is it coming from the top ring?
Plan a gasket or putty fix, or a reseat.
Is it at a hose or pipe on the side?
Tighten or replace that connection.
Is it hard to say?
Dry everything, run water for a minute and watch again with a flashlight.
If you cannot tell, take a short video of the unit while water runs and send it, or describe it on the call. A plumber who can picture the leak can usually tell you what the repair is before arriving.
Habits that keep the next unit tight
- Do not overload the unit with fibrous or starchy foods.
- Run cold water during and after use.
- Check the clamps and connections once a year.
- Keep the cabinet clear so a leak is easy to spot.
- Replace a unit that jams or trips often, since vibration loosens seals.